Here’s an easy and free homemade hair conditioner that will make your hair feel silky and soft like nothing else! (more…)
Category: DIY
-

Easy Homemade Ornament Recipes

How To Make Homemade Ornaments – Easy Recipes
These easy recipes for homemade ornaments are fun gifts to make, easy on the budget and great to receive!
(more…) -

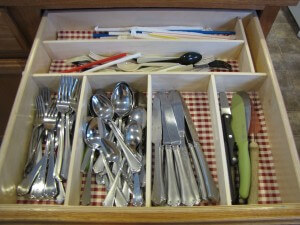
DIY Drawer Organizer for $6

Since we moved into our current house, my silverware drawer has been driving me crazy. I could not find any kind of drawer organizer to organize it! It’s hard to tell in the pictures below but I found some plastic containers at the dollar store and I had been using them to organize the drawer. The problem was that they didn’t fit so the sides were smashed in and they kept sliding all over the place so they wouldn’t stay put. I tried duck tape and grippers, all of it and it wouldn’t stay put. The other problem was that the compartments just weren’t arranged well and they were too small.
So I set out to fix it. I went to four or five stores and bought five or six different silverware trays and nothing would fit my drawer right! Then I saw the best thing! It was an adjustable divider. You could buy as few or many as you needed and then just make your own. They had a spring on the end that moved the divider longer and it was perfect! I was so excited that I grabbed it at Bed Bath and Beyond… Then I looked at the price. $20 EACH!!!! ARE YOU KIDDING ME??? It would cost me $100 to organize one drawer. NO WAY!!!
As I was cruising around the Internet one day, I found someone who had made her own. I didn’t keep the link because I thought, “Yeah right! What a pain to make.” Then after my $100 revelation, I thought, “What can it hurt to try??”. So I went to Lowe’s and got 2 pieces of birchwood and made my own drawer organizer. It was pretty simple!!
-

Homemade Bath Balls, Soap Balls and Heating Pads
FUN GIFTS TO MAKE ~ EASY ON THE BUDGET ~ GREAT TO RECEIVE!
By Lois Breneman, Heart to Heart Newsletter, [email protected]Fragrant Soap Balls
Ivory Snow Flakes
Perfume or scented oil
Food coloringMoisten soap flakes with water to the consistency of very stiff dough. Divide into several bowls if making a large quantity, so you can make a variety of scents and colors. Shape about 2 tablespoons of mixture into balls. Place on wax paper to harden for several days, turning each day. Wrap in colorful cellophane and tie with a ribbon to give as gifts. Arrange in a small box or in a small basket lined with colorful tissue paper.
Bath Balls
2 cups finely ground sea salt
1 tsp. Vitamin E oil
½ cup baking soda
2 eggs
½ cup cornstarch
25 drops fragrance oil
2 Tbsp. light oilPreheat oven to 250 degrees. Mix all ingredients together. Using a teaspoon of the dough, gently roll it into a 1 inch ball. Continue this method, placing balls on an ungreased cookie sheet. If desired, you can decorate balls with whole cloves or rose buds. Bake the bath balls for about 10 minutes until they are lightly browned – do not over bake. Allow the balls to cool completely. To use: Drop 1 or 2 bath balls into a warm bath and allow to dissolve. Note: If you give these bath balls as a gift, be sure to list all the ingredients in case of allergies, as well as instructions on how to use.
Heating Pad Or Foot Warmer
This is great to warm cold feet when going to bed or to sooth tight neck muscles. ½ yard cotton flannel 4 cups uncooked white rice 1 Tbsp. whole cloves Cut the flannel into a 14”x18” rectangle. Fold with right sides together, so the rectangle measures 7”x18”. Sew around edges, leaving an opening for turning. Fill with rice and cloves. Hand sew the opening shut. For gift-giving, include instructions: To use as a heating pad, microwave for 1-2 minutes in High.
photo by: themeparkmo
-

How to Haul the Frugal Way
My brother sent me these. These are so funny! What’s funny is it’s just like something I would do. I am forever coming home from garage sales with stuff strapped on or in the car. One time, I stuffed a rototiller in the back of the car. It didn’t fit and I had to leave the trunk open, so I tied a rope around it. HA! It’s a good thing I only had about a mile to go because that thing was going to roll out at any minute. My neighbor just shook his head when he saw me driving up.
Another time, my Dad and Mike were building a greenhouse for me. It was 16’x20′ and they needed some really long boards. They tied them on the sides of my dad’s small pick-up and then had to climb in the WINDOWS to get in the car! LOL That was right after we were married. Mike got initiated into my family’s “make do” in hauling methods really quickly. :-)
Mike always knows it’s not a good sign when I go out “garage saleing”, say I will be gone a couple of hours and I’m back in 15 minutes to “unload”. hehehe
Enjoy! These are just too funny!
Tawra
Hey, I strapped it down.
No problem, I can see through the holes.
Who needs a truck?

#3549 in the 10,000 uses for Duct Tape
-

Homemade Wallpaper Paste Recipe
Try this easy Homemade Wallpaper Paste recipe with step by step instructions and pictures to make it easy for you! (more…)
-

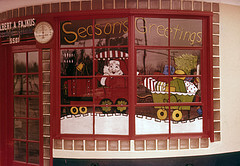
Paint your windows for Christmas
To paint windows add a teaspoon of liquid dish soap to acrylic craft paint. You can use sponges in Christmas shapes if you aren’t good at free hand drawing. After the holidays, you can wash it off with window cleaner. Use a non-scratching dish scrubber or plastic scraper for stubborn spots.
photo by: radiomariena
-

Winterizing and Preparing for Winter

Winterizing and Preparing for Winter
This time of year things seem to move so quickly. Halloween is just around the corner and before you know it Thanksgiving and Christmas will be here. To say things will be hectic for most of us is an understatement so now is the perfect time to get as many household projects out of the way as possible before the holiday rush really hits.
Pick a weekend and spend a whole day getting as many things on your list done as you can. Then you won’t have to worry about them for the rest of the winter. Finishing household projects now will also help you be more prepared for when you have a house full of company and really don’t want the furnace breaking down.
Here are some suggestions for things to add to your to do list. Of course, you will have your own things to add to it. I don’t do even half of these things because some don’t apply to me so don’t panic about how long your household project list is. This list is just a sample guideline for you to use.
- Check the furnace.
- Clean the flue on your fireplace
- Winterize your house.Winterizing includes tasks like:
- Putting away hoses
- Putting Styrofoam on my outside faucets to keep them from freezing.
- Putting up storm windows
- Check doors for appropriate weather stripping.
- Get out winter clothes and put away summer clothes.
- Get out your bedding and air it out if it needs it. Place it in the bedrooms where it is ready to use. Put the electric blankets on the bed for that unexpected cold night.
- Change the batteries in smoke detectors.
- Make sure your fire extinguisher’s expiration date is still okay.
- Put your winter emergency kit in the car. Include a couple of blankets, extra mittens, hats, coat, boots, a small shovel, cat litter, etc.
- Clean out your garage or storage sheds.
-Jill
photo by: tripletri
-

My Cool Homemade Key Holder!
My Cool Homemade Key Holder!
I had this broken rake. I hated to throw it away because I just “knew I could use it for something“. hehehe
I needed something to hang my keys on so I had a lightbulb moment. :-)
The only problem is I’m afraid that someone is going to skewer themselves on it so I think I need to put it up higher and in a frame.
-Tawra
PS You could use this for things like dog leashes or in a storage shed to hang your small gardening tools by sliding the handles into the slots.
-

Wrapping Paper Holders

Mom found this on pinterest and just thought she had died and gone to heaven! Wrapping paper unrolling has driven her crazy for years and now her life will change!! Check out these wrapping paper holders from joyastle.com .
-

Sewing Tips

Sewing Tips
I just finished an article for a future newsletter on the website and as usual I had more tips than I had room. Here are a few “leftover” odds and end tips I thought some of you could use.
- Use knitting needle guards or a small cork to protect the end of small scissors, especially when you are traveling with them.
- Use a mesh bag (like potatoes or fruits come in) to put your yarn in when knitting.This is especially good when using more than one color because you can pull each color through a different hole in the bag.
- If you are hand appliquéing and use beeswax to keep your thread from tangling, run the thread over the beeswax then press it with your iron. This embeds the wax into the thread so it all doesn’t come off with the first stitch. This really isn’t that hard. It doesn’t take as much time as you would think and it works so well. It doesn’t hurt your iron, but it does help the iron glide more smoothly.
- When appliquéing, if you don’t have an appliqué sheetfor pressing several pieces together save the sheets you peel your computer labels from. Press your applique pieces to the shiny side.
- If you use a guard glove with your rotary cutter, store your cutter inside the glove. That way you will always know where it is. I also keep my cutter in an old fabric eye glass holder.
- I didn’t know for a long time when using a sewing “ham”the wool side is for pressing wool and silk and the duck side is for pressing cotton and linen. A sewing ham is an odd ham shaped thing which is used to press curved and usual angles especially in sewing clothes.
- One thing I learned years after I had been sewing was that there is a right and wrong side to a needle.If you have trouble threading a needle, turn the eye around and try the other side. It’s amazing how well this works.
- Holding a needle against a white background makes it easier to see and thread.
- Instead of licking your thread, lick the needle itself and be sure to bring the needle to the thread not poke the thread into the needle. Try these things to see if it helps in threading your needle next time.
- Use embroidery bobbins(those square white cards you wind embroidery thread on) to wrap regular thread on to carry for you projects. They are flat and take up very little space. I have used sewing machine bobbins for my portable sewing but I like these are even better.
These are a few ideas for now. I know many of your have some great ones, too. I do believe quilters, crafters and sewers have some of the coolest ideas. It always amazes the things they can come up with. : )
-Jill
-

Homemade Chalkboard Paint Recipe

Did you know you can make your own Chalkboard Paint? I haven’t tried it yet but I’ve seen this recipe several places and it seems really easy.
My 8 year old wants a wall of chalkboard and I just might try this! By the way, look in the marked down section at Lowe’s or Home Depot for broken open non-sanded tile grout packages. It would be cheaper than than buying a new package. You could also ask friend, family or in our case you might ask the builder in your subdivision if you can just have some if they are remodeling. 1 Tbsp. isn’t much so I’m sure they would just give it to you for asking.
Don’t forget, those acrylic craft paints come in thousands of colors so you could make some really cool and colorful chalkboards!! Isn’t the one above from BHG.com just too cool! Tawra
Homemade Chalkboard Paint
1 Cup of latex house paint or acrylic craft paint
1 Tbsp. of non-sanded tile grout
Mix paint and grout together making sure all lumps are out. The using a roller* or brush paint on wall or object where you want a chalkboard. Paint 2 coats for best coverage. After it’s dry use a fine sandpaper and lightly sand to make smooth.
*A roller makes the paint go on smoother.
Photo by: foxtonge
-

Homemade Garden Bench

So I am so excited to get going on my new yard that I am trying to keep myself from going out and start digging in the snow. :-) Of course, that would be a little hard since the ground is frozen so, to keep myself from going crazy, I’ve been looking all over pinterest.
Well, I ran into this project that I know I am going to have to try!!! I had to sell my garden bench when we moved and this would be just too cute to replace it!! Now I know what I can do with some of the dumpster dived wood we’ve been collecting! You can see how they did it here at studiogblog.com but I think it originally came from junkmarketstyle.com
-Tawra
-

Christmas Card Books

Christmas Card Books
I saw these Christmas Card Books and thought they were a great idea! I just throw mine away but this is a good idea if you like to keep all your Christmas cards.
Tawra
-

“Tis the Season” Homemade Sachets

It is always best to get as many gifts put together ahead of time as you can for the holidays. These “Tis the Season” Homemade Sachets would be fun for the kids to work on over Thanksgiving break. Place them in a sealed container or plastic bag after they are made to keep the scent fresh and then they will be ready to give to their teachers or to anyone for a wonderful little gift.
These homemade sachets are nice to tie to a package under the tree. They also add a nice touch if you place a few in a Christmas box you are sending in the mail to someone. The minute they open the box they get the smell of Christmas.
If you want to make them early, they would be good for little party favors to send home with your guests on Thanksgiving day or for any holiday party.
“Tis the Season” Sachets
1 qt. fir needles
2 cups coarse salt (not iodized)
2 – 4 bay leaves, coarsely crumbled
1 cup rosemary
1/2 cup basil
1 cup dried oranges, lemons, cranberries, thinly shredded (any combination)Mix and pour into little fabric bags. Place wherever you’d like some scent. Makes 5 cups.
From Dining on a Dime
photo by: three_french_hens
-

Photo Tile Coasters

Photo Tile Coasters
I found these at oopseydaisy and thought they were beautiful! These would be great for Grandmas and Grandpas but don’t forget you can use anything for the picture. I made one that had a page from a lovely Victorian floral calendar. I made it to put on my desk for my tea.
You could do:
-
Animals for kids areas
-
Your kids favorite video game character
-
Sports Teams
-
Make X AND O’s and make big Tic Tac Toe game pieces.
-
The possibilities are endless!
-Tawra
-
-

How to Make Blue Glass Jars

I saw a Make Your Own Blue Glass Jars Tutorial over at Remodaholic. Wouldn’t these be pretty sitting on a mantle for Christmas and you use them making jars that you would normally throw away. It is super simple to make and yet so elegant!
Tawra
-

Artistic Ways To Recycle Cans
I admit it– I’m not into recycling. Yes, I do it all the time but to actually recycle with a recycle bin… I don’t do it. But…I have to say when I see how they recycled these tin cans I just had to share. Some of these from bystephanielynn.com are just beautiful and I would love to have some and will probably make some myself! Be sure to check them out!
-

Chocolate Covered Spoons / Marshmallow Sticks – Homemade Christmas Idea
Chocolate Covered Spoons are a great homemade Christmas present idea! What could be simpler but elegant and fun.

Holiday chocolate covered spoons are so super simple to make!
All you need is:
-
plastic spoons
-
chocolate chips or chocolate melting wafers
-
decorations
That’s it!
Here’s how you make chocolate covered spoons:
-
Lay out waxed paper on the counter.
-
Melt the chocolate in the microwave.
-
Then stir the spoon into the chocolate chips.
-
Lay on the waxed paper and decorate.
You could sprinkle any of the following on the chocolate covered spoons to make them more festive:
-
crushed peppermint
-
sprinkles
-
mini white chocolate chips, or white chocolate shavings
-
marshmallows
-
small candies
-
red hots
-
coconut
I just love the way alphamom.com made a little snowman out hers. Isn’t that cute?

These chocolate spoons from deliciousdeliciousdelicious with the colored spoons make a great party favor for any occasion! Just think– You could do your favorite team’s color and have them for tailgate parties or for the Super Bowl!

Of course these chocolate covered gift spoons from BHG.com are just super elegant! If you want to wrap them, you could use florists bags or candy bags from the hobby store.
-Tawra
Chocolate Marshmallow Sticks
You can also do this same thing with marshmallows. Press a marshmallow on to short straws or lollipop sticks then dip in the any of the above and stir hot chocolate with them.
-
-

Money Tree- Homemade Christmas present idea.
Now that the kids and grandkids are in their teens they love getting money for the holidays. Mike and my brother love getting it too because then they can save up and buy the "big" presents that they want but no one can afford to give them like cameras and stereo equipment.
Here are a few of the ideas that we have used in the past to give money in creative ways but then I also found these two from Then She Made and thought they were just the we needed for this year to add a new way to give money. Tawra

-

Homemade Christmas Present Idea- Ice Cream Sundae Kit

Homemade Christmas Present- Ice Cream Sundae Kit
Jan at mixingbowlkids.typepad.com came up with this really cute Ice Cream Sundae Kit. This would be great to give as a family gift and to teachers! It would easy to make up several of these all at once and have them done and ready to go before Thanksgiving!
You can get cheap cellophane bags from a florists shop and all the goodies in bulk from a warehouse store in bulk foods store.
Tawra
-

Homemade Christmas Present Idea- Mason Jar Soap Dispenser

I admit, I would LOVE to get this for a Christmas gift since I love all things old! Since I didn’t think Mike would be up to making one I decided to make one myself and I LOVE it!!! It’s probably my favorite thing in my newly decorated kitchen (which I will hopefully show pictures of later.).
It was super simple to make, too! Here are some instructions from theblissfullycontentlife.blogspot.com if you would like to make some for your family.
Here’s how I did mine:
1. Hammered a nail in the middle of the lid.
2. Removed nail and cut the hole bigger with tin snips. You could also use wire cutters.
3. Inserted my recycled pump I got for free from another bottle. I got mine from a larger bottle so I just cut the straw part off until it fit into my mason jar.
4. Put waterproof glue/caulk around the pump hole on the underside of the lid.
5. Let dry overnight and then filled with dish soap.
I LOVE, LOVE, LOVE it!!!!
Tawra
-

Halloween Decorating Idea- Mummies
From Parent.com

From BGH.com
Aren’t these the cutest mummies! All you need to do is take some normal gauze from the first aid aisle at the store or cheesecloth and wrap them around your pumpkins.
Tawra
-

Halloween Decorating Idea- Spiderwebs
This is such a simple Halloween decorating idea. We did something similar to this for our $25 Halloween party. .25 spider webs strung all over the house just added the right amount of "creepy".
Tawra